
Snakemake is a popular workflow management tool that can help organize, document, scale, run, and reproduce your workflows. Snakemake workflows are described via a human-readable, Python-based language, and can be integrated into SCINet high-performance computing (HPC) clusters via Slurm and Conda.
In this workshop, Aaron Yerke (SCINet/AI-COE fellow) will introduce the basics of a Snakemake workflow and demonstrate how to run it on a SCINet cluster. After attending this workshop, you should be able to integrate Snakemake into your own projects on SCINet HPC clusters.
Note that this tutorial is for Snakemake versions 8+, as version 8 introduced changes that are not compatible with previous versions.
Pre-Workshop Instructions:
To help minimize technical issues and delays at the start of the workshop, please try the following tests prior to the workshop.
- Logging on to Ceres Open OnDemand (OOD):
- Please confirm you can successfully log in to Ceres OOD with your SCINet account (see login instructions here). If you are successful, you will be able to see the Ceres OOD home page.
- Ceres Shell Access:
- When on Ceres OOD, click on the top navigation bar: “Clusters” > “Ceres Shell Access”. A new tab will appear that looks like a shell terminal (e.g., like PowerShell).
- Please confirm you do not receive any error messages or requests to re-authenticate and that the final line looks like “[firstname.lastname@ceres ~]$”.
Tutorial Setup Instructions
Steps to prepare for the tutorial session:
- Login to Ceres Open OnDemand. For more information on login procedures for web-based SCINet access, see the SCINet access user guide.
- Open a command-line session by clicking on “Clusters” -> “Ceres Shell Access” on the top menu. This will open a new tab with a command-line session on Ceres’ login node.
-
Request resources on a compute node by running the following command.
srun --reservation=workshop1 -A scinet_workshop1 -t 02:00:00 -n 1 --mem 8G --pty bash -
Create a workshop working directory by running the following commands. Note: you do not have to edit the commands with your username as it will be determined by the $USER variable.
mkdir -p /90daydata/shared/$USER/snakemake_ws
cd /90daydata/shared/$USER/snakemake_ws
cp -r /project/scinet_workshop1/snakemake/SCINET_Snakemake_tutorial .
cd SCINET_Snakemake_tutorial
We are now ready to setup and run Snakemake!
Snakemake Introduction
Snakemake is a Python retooling of the standard UNIX tool called “Make”. It can be used to document and automatically run a pipeline and can help run jobs in parallel.
The main driver of action in Snakemake is the “rule”. At minimum, a rule will have an input, which are files that trigger Snakemake to run the rule. Most rules will also have an output too, which will allow Snakemake to make a chain of actions based on inputs and outputs. A rule can run a command in the commandline or it can run python. Variables that are passed from rule to rule are called wildcards. Wildcards are valueable tools for adding parallel processes to the the workflow. See more at: Snakemake Logic
Snakemake can be customized for various types of system infrastructure. In this tutorial, we will set up Snakemake to submit jobs to Slurm and have those jobs run in specific Conda environments. The details of how each job will run are going to be given in a config file (workflow/config/config.yaml) and in the Snakefile file, which directs Snakemake on how to run jobs.
In this sample project, we will download the famous MTCars dataset, organize it, create a predictive model, and organize the output of the model. This will demonstrate how to use Snakemake to process each column of a specific data table is run in parallel. In this tutorial we will use the command line to set up Snakemake and then use Snakemake to run an example pipeline that consists of R and Python scripts.
We will go over the files in this project in the following sections. To see all of them:
tree
When you run that, you should see something like this:
.
├── LICENSE
├── README.md
├── SCINet_Snakemake_workshop.md
└── workflow
    ├── Snakefile
    ├── config
    │   └── config.yaml
    ├── env
    │   └── snk_mk_conda_env.yml
    ├── reports
    │   ├── dag.png
    │   └── rulegraph.png
    ├── resources
    │   └── snakemake_icon.png
    └── scripts
        ├── data_org
        │   ├── combine_2_csv.R
        │   ├── combine_rf_data.R
        │   └── make_rf_test_dfs.R
        └── ml
            └── random_forest.py
Snakemake logic
The instructions to Snakemake for running the pipeline are typically found in /workflow/Snakemake. This file, commonly referred to as a “Snakefile”, contains the rules that Snakemake is meant to follow as well as links to config files.
cat workflow/Snakefile
The rules in the file are prepended by the keyword “rule” and given a unique and descriptive name. Most of them have input and output designations. The inputs and outputs help Snakemake build a Directed Acyclic Graph (DAG) of the rules to create the workflow.
Wildcards are designated by curly brackets “{}” and the name of the wildcard in the input and output sections of the word. In the shell command section of the rule, the name of the wildcard must be prefixed with “wildcard.”.
Our rules
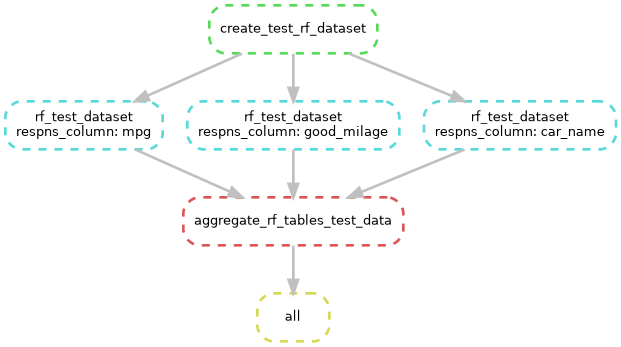
This pipeline can best be described by summarizing the rules, in the order that their actions are triggered:
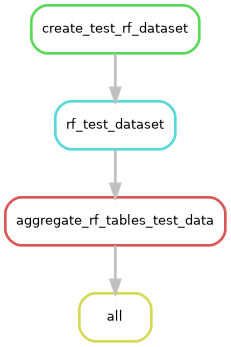
- rule create_test_rf_dataset
This rule will download the “Cars” dataset using R. From that dataset, it will make a table of response variables that includes
mpgas numeric values andgood_mileageas a categorical variable. The predictor and response tables are saved to thedata/unit_testdirectory. - rule rf_test_dataset:
Reads in the response columns one at a time to the random forest. The random forest makes a PDF graphic, saved to
output/unit_test/graphicsand a table of the scikit-learn scores (r squared formpgand accuracy forgood_mileage) inoutput/unit_test/tables. - rule aggregate_rf_tables_test_data:
This rule tells Snakemake to look for the later output and then aggregates all the scores into a single file. This rule makes use of the
expand()helper function, see https://snakemake.readthedocs.io/en/stable/snakefiles/rules.html#helpers-for-defining-rules to see all the helper functions. In this case,expand()creates a list of file paths for each of the response_cols wildcards, see Our wildcards for a bit more about wildcards. - rule all This is the final rule that only has input. It is a catch-all rule that holds the final output of all other rule chains. If you have multiple chains of rules, the end product of each chain will go here. Note that there is a convention to name this rule “all”, though it is not required by Snakemake.
Our wildcards
Wildcards enable Snakemake to identify and keep track of different files in the workflow. Our wildcards are defined on line 8 of the Snakefile as
response_cols = ["mpg","good_mileage","car_name"]
These wildcards are the column names of data/unit_test/mtc_response.csv that we download in rule create_test_rf_dataset. You will notice that intermediate files for this workflow use those wildcards in the filenames.
Configuation
The main file for configuring Snakemake to your system architecture is workflow/config/config.yaml. This file has some features to note:
cat workflow/config/config.yaml
The first 14 lines instruct Snakemake to use the generic cluster executor plug-in to launch jobs with sbatch, which is the Slurm batching command.
- Line 4 runs before the executor to create a top level directory to store the Slurm log files in a directory called “slurmLogs”.
- Lines 10 and 11 tell Slurm to put slurm reports in a subfolder of
slurmLogsnamed after the name of the rule. The name of the log file is the name of the rule, followed by wildcards and the Slurm job number. - Line 14 is commented out, it would tell Slurm where to send notification emails. To use this line, remove the “#” and add your email address where the placeholder address is.
To edit this document, you can open it with the Vim editor or any other editor of your choice (nano is another good option).
vim workflow/config/config.yaml
Once Vim starts, type “i” to turn on “insert” mode, which makes it easier to edit the file. After you uncomment the line of code, you can exit Vim by hitting “Esc” and then typing “:wq” and hitting “enter”.
The next section (lines 15-20) holds the default parameters. They are currently set for small jobs. As you add Snakemake to your own pipelines you can update these to your own requirements.
Additional rule components
Conda
Snakemake can execute rules in specified Conda environments. The environments should be specified for each rule in the optional “conda:” header.
conda:"env/snk_mk_conda_env.yml",
In this tutorial project, only one Conda environment is used, but as many as needed can be used. Snakemake expects the Conda environment YAML file to be found in the workflow/env folder. In order to execute jobs on the cluster, the environment that you run snakemake from requires the snakemake snakemake-executor-plugin-cluster-generic from line 17.
cat workflow/env/snk_mk_conda_env.yml
This file holds the Conda environment that you loaded in Tutorial Setup Instructions. There are comments at the top and bottom of this file to help you install it when you need to set up your own projects.
Resources
Default resources are allocated in workflow/config/config.yaml, but for a given rule, these resources can be modified for individual rules with a “resources” block. In the example below, a custom runtime and memory allotment would be requested when this rule is submitted to Slurm. This can be seen in rule rf_test_dataset from the Snakefile, for example. If this is not specified then the default resources are requested.
	resources:
		runtime=10, #format: M, M:S, H:M:S, D-H, D-H:M, or D-H:M:S
		mem_mb="8gb"
Run snakemake
Set up environment
-
Load miniconda for access to Conda environments.
module load miniconda -
Load the Conda environment for Snakemake and the libraries for the pipeline. This environment will be available as long as the files from the completed environment in
workflow/envdirectory are available. The YAML file to build this environment and instructions for creating it can be found atworkflow/env/snk_mk_conda_env.yml.source activate /project/scinet_workshop1/snakemake/snakemake_env
First, we need to do a dry run to see what jobs will run:
snakemake --profile workflow/config -n
This does not submit any jobs to the cluster. If the output looks acceptable, run it again without the “-n” tag.
snakemake --profile workflow/config
This will actually launch the jobs, and if you have added your email to line 14 of the config file, you should receive confirmation as well.
After all of your Slurm jobs have completed, you should see that files have been downloaded into the data folder and output has been generated in the output folder.
tree
Now you can run Snakemake and integrate it into your own workflows. Give it a try!
Other useful commands
Snakemake can make diagrams of your workflow, as seen in the two images above.
snakemake --rulegraph |dot -Tpng > workflow/reports/rulegraph.pngUsed to make first graphic that shows order of rule execution.snakemake --dag |dot -Tpng > workflow/reports/dag.pngUsed to make the 2nd graphic that show a more detailed graphic.
Additional resources
Snakemake has an extensive community of users that post their content, as well as several of their own tutorials and detailed documentation. In addition to those, here are some resources used to make this workshop:
Workshop Materials
Workshop materials and recordings available for USDA employees at the links below
-
2025 · Individual Snakemake assistance
-
2025 · Introduction to Snakemake