
Microsoft’s Visual Studio Code (VS Code) is a popular source-code editor and development environment with support for many different programming languages.
There are two main methods to use VS Code on SCINet clusters. Method 1 is to use the VS Code interactive application in Open OnDemand (OOD VS Code). Method 2 uses the Microsoft “Remote – Tunnels” extension that connects to the cluster from your local VS Code session via a secure tunnel, allowing you to execute your code on the cluster from within your local VS Code session (local VS Code).
Method 1: VS Code in Open OnDemand
(OOD VS Code)
- Go to Ceres Open Ondemand and log in.
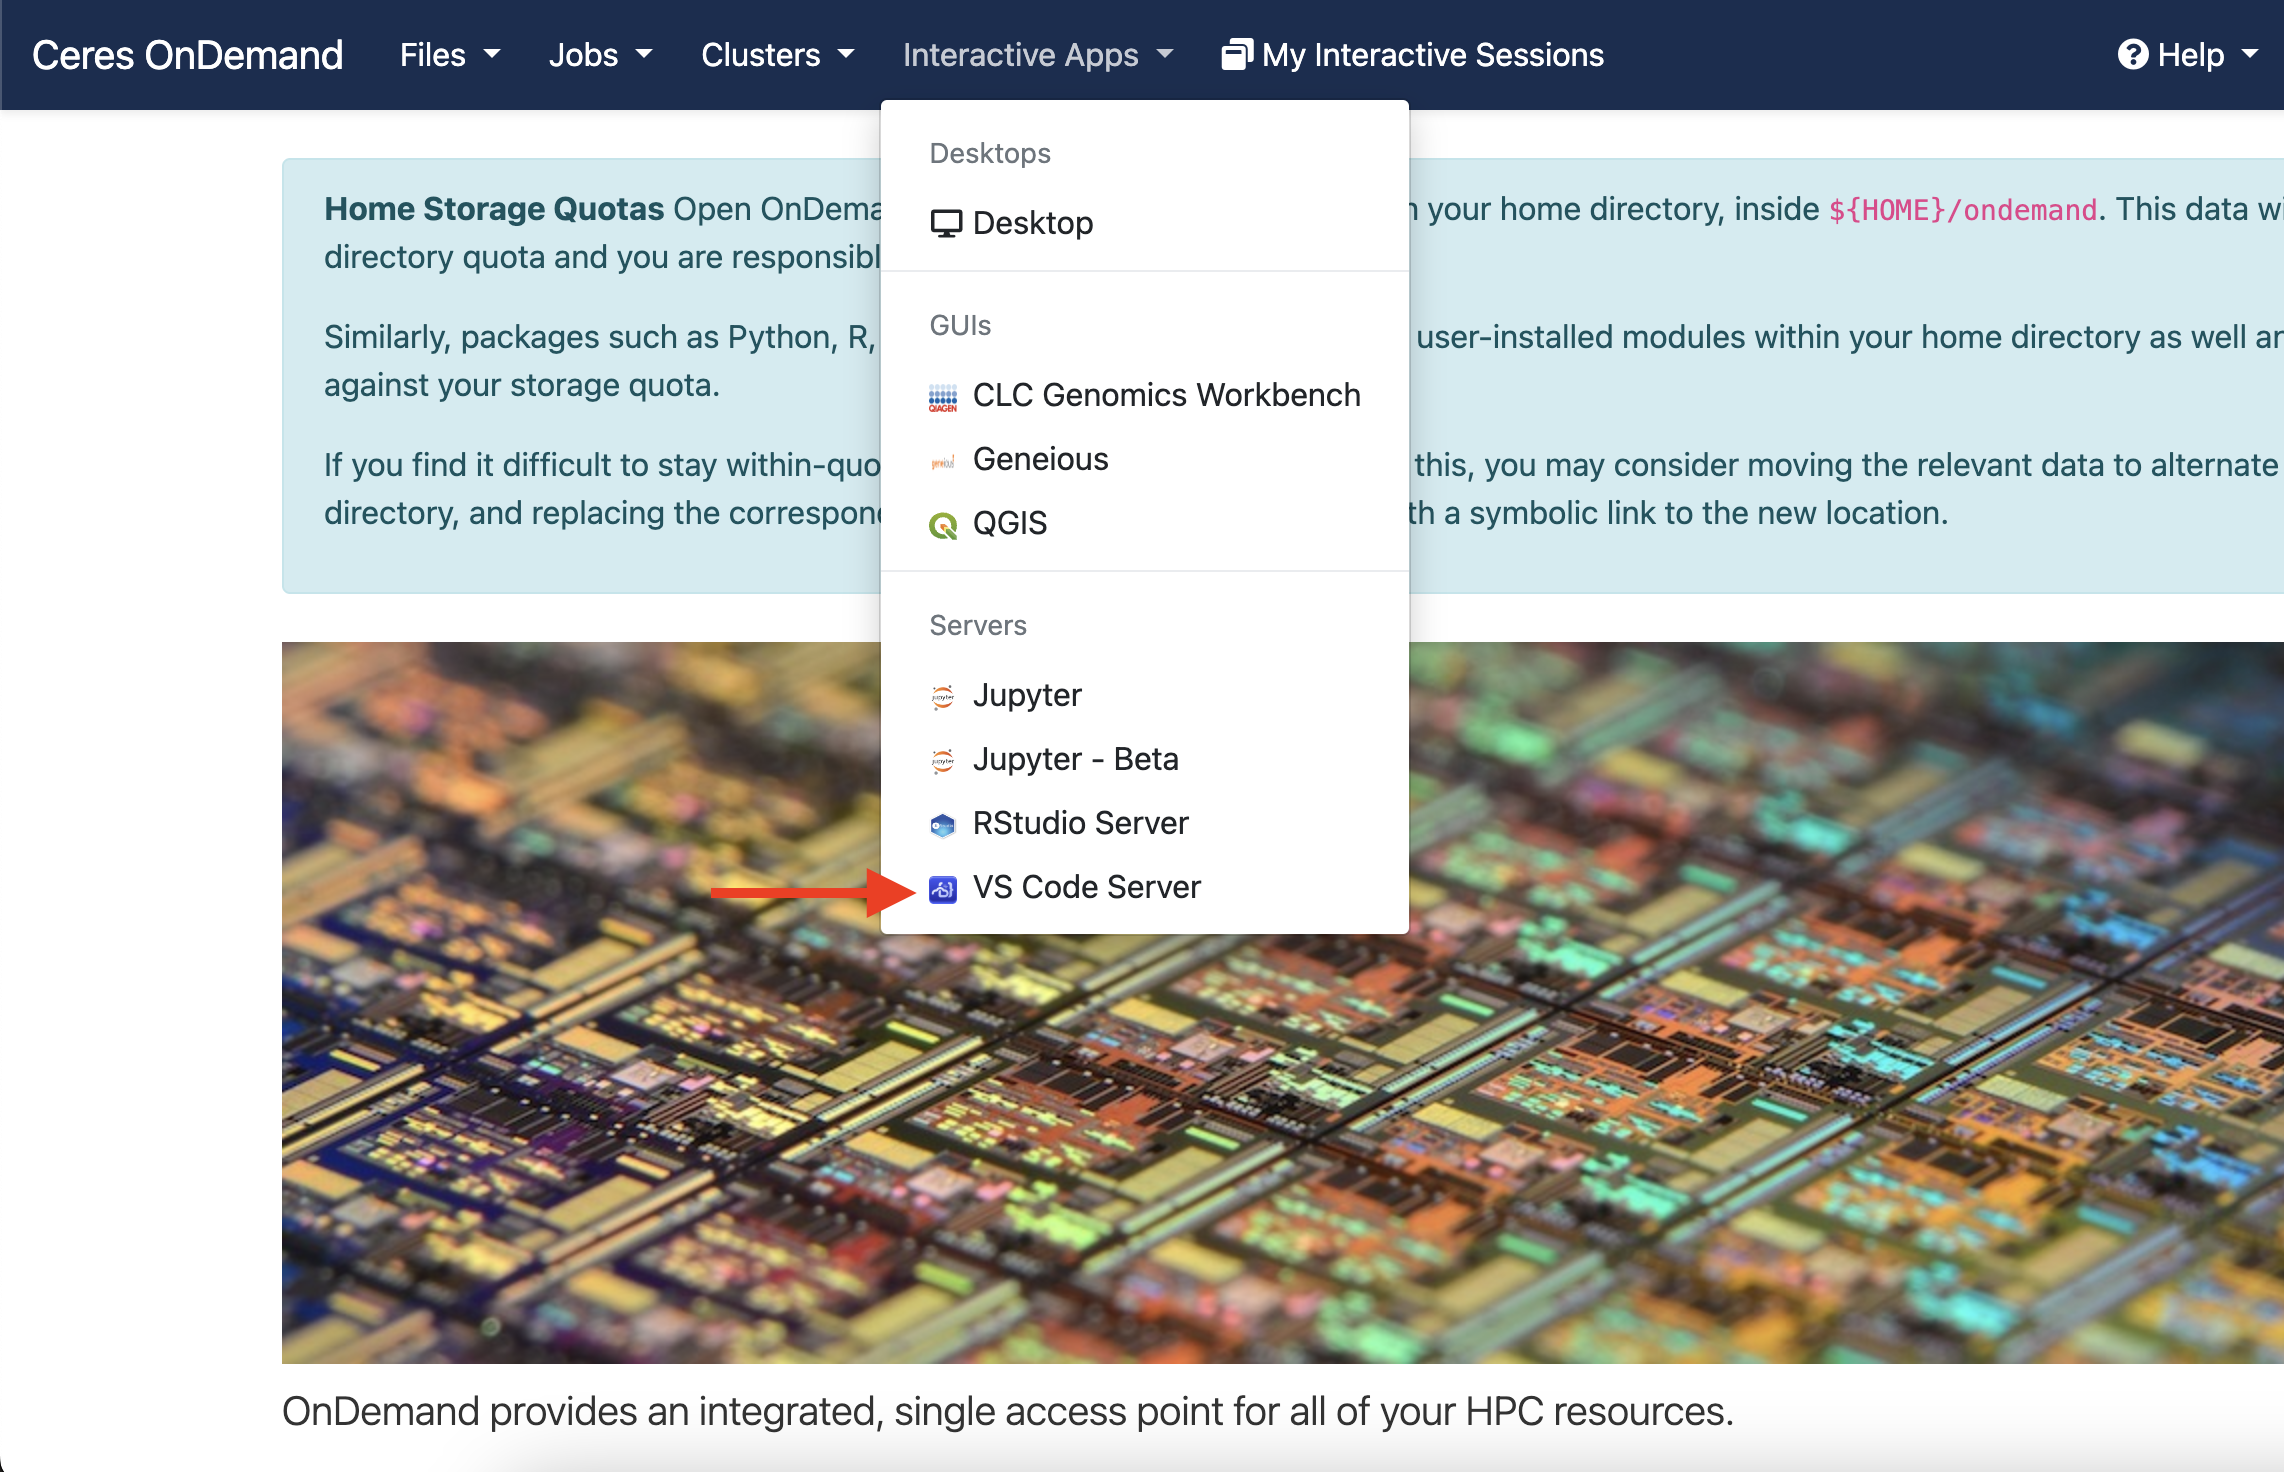
- From the Interactive Apps menu at the top, select “VS Code Server”
- Select the account you would like to use to run this job, as well as any other desired options. The defaults are usually sufficient, but if you want to run from a project rather than your home directory, be sure to update your working directory path.
Click “Launch”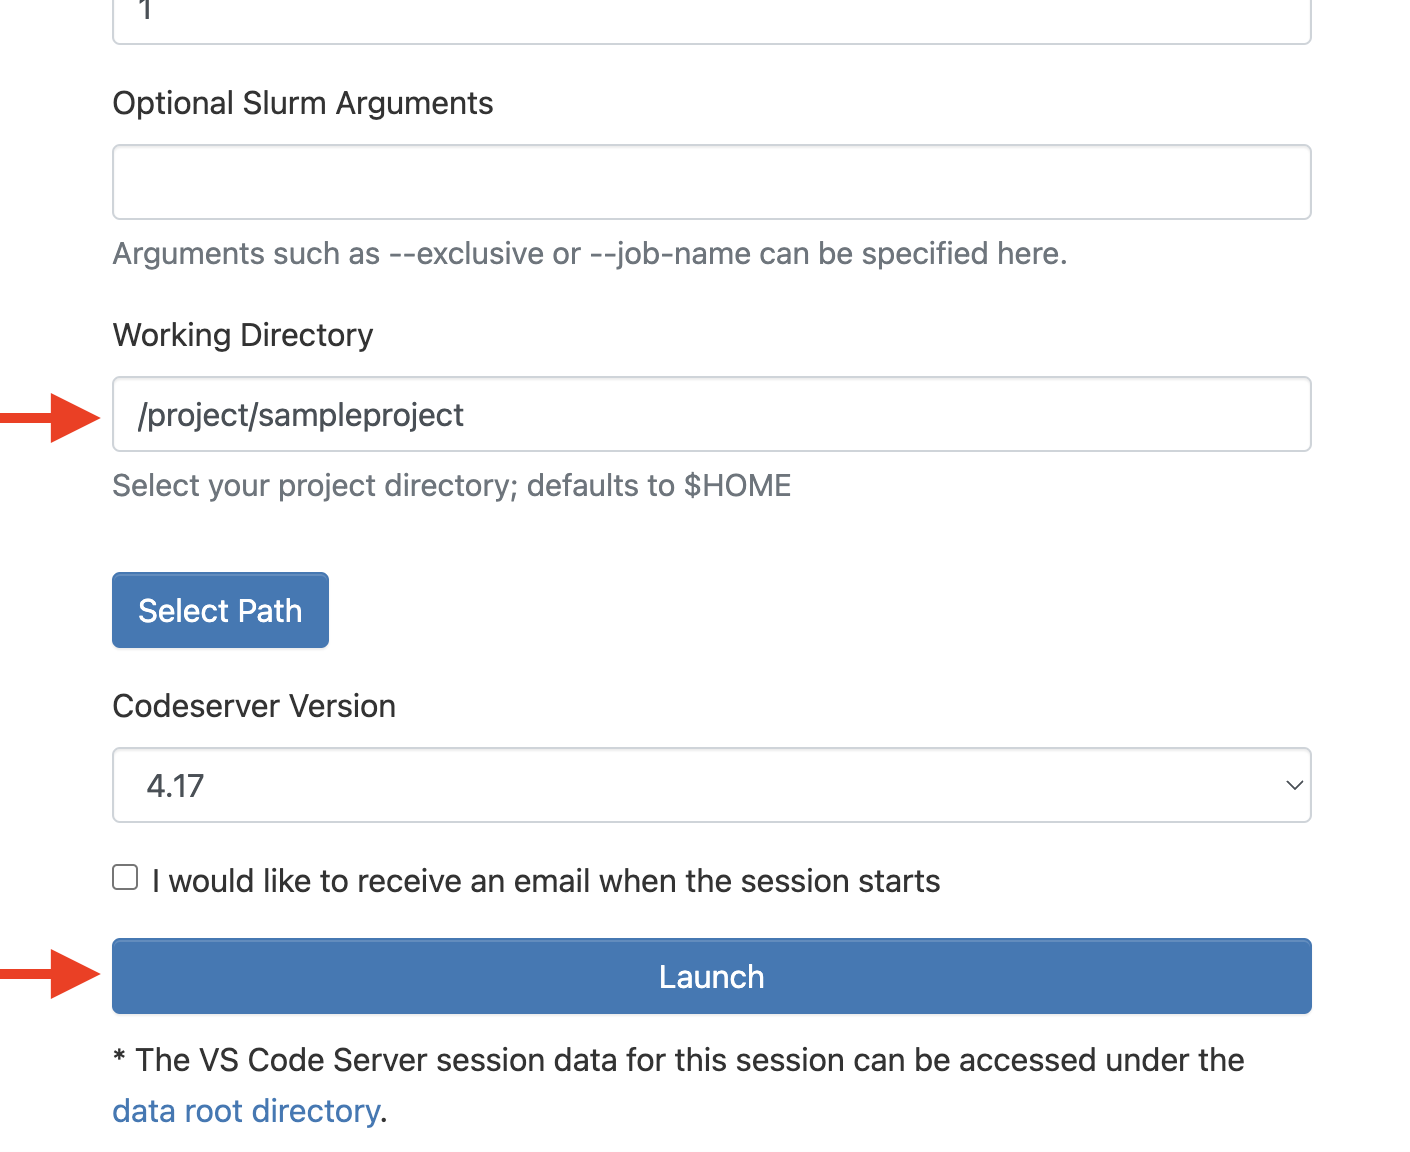
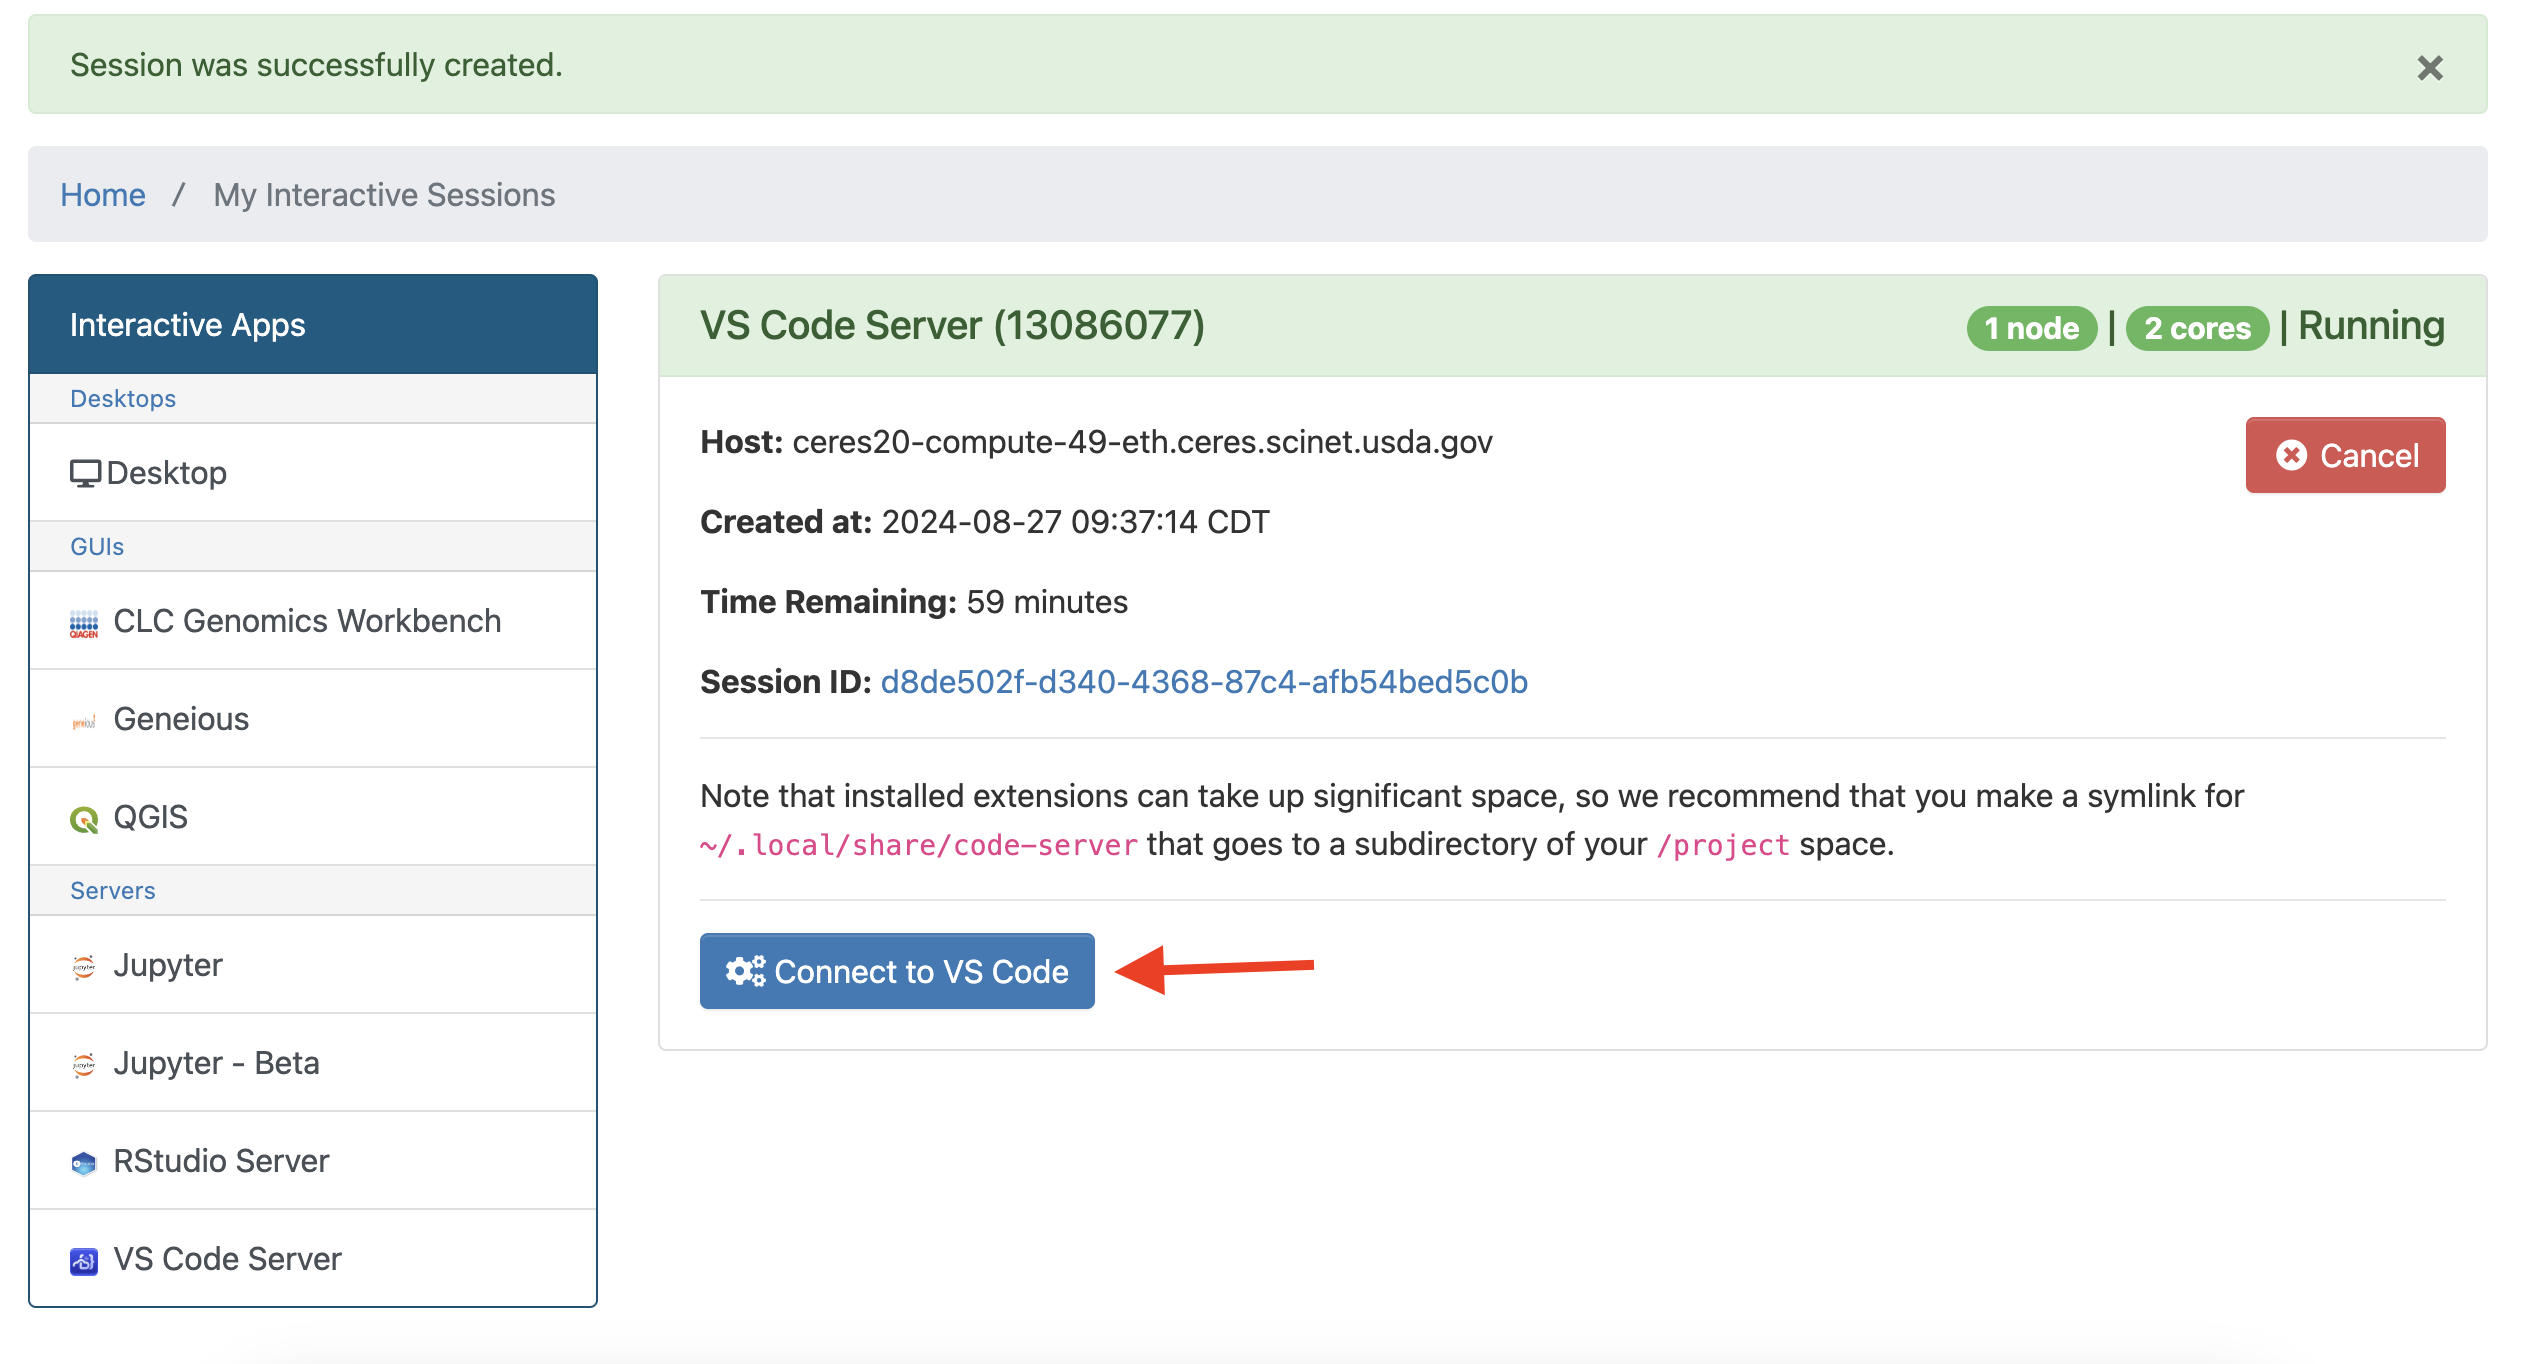
- A new VS Code session will automatically be created on one of Ceres’ compute nodes. This may take a few minutes depending on cluster demand. Once the session has been created, click “Connect to VS Code”.
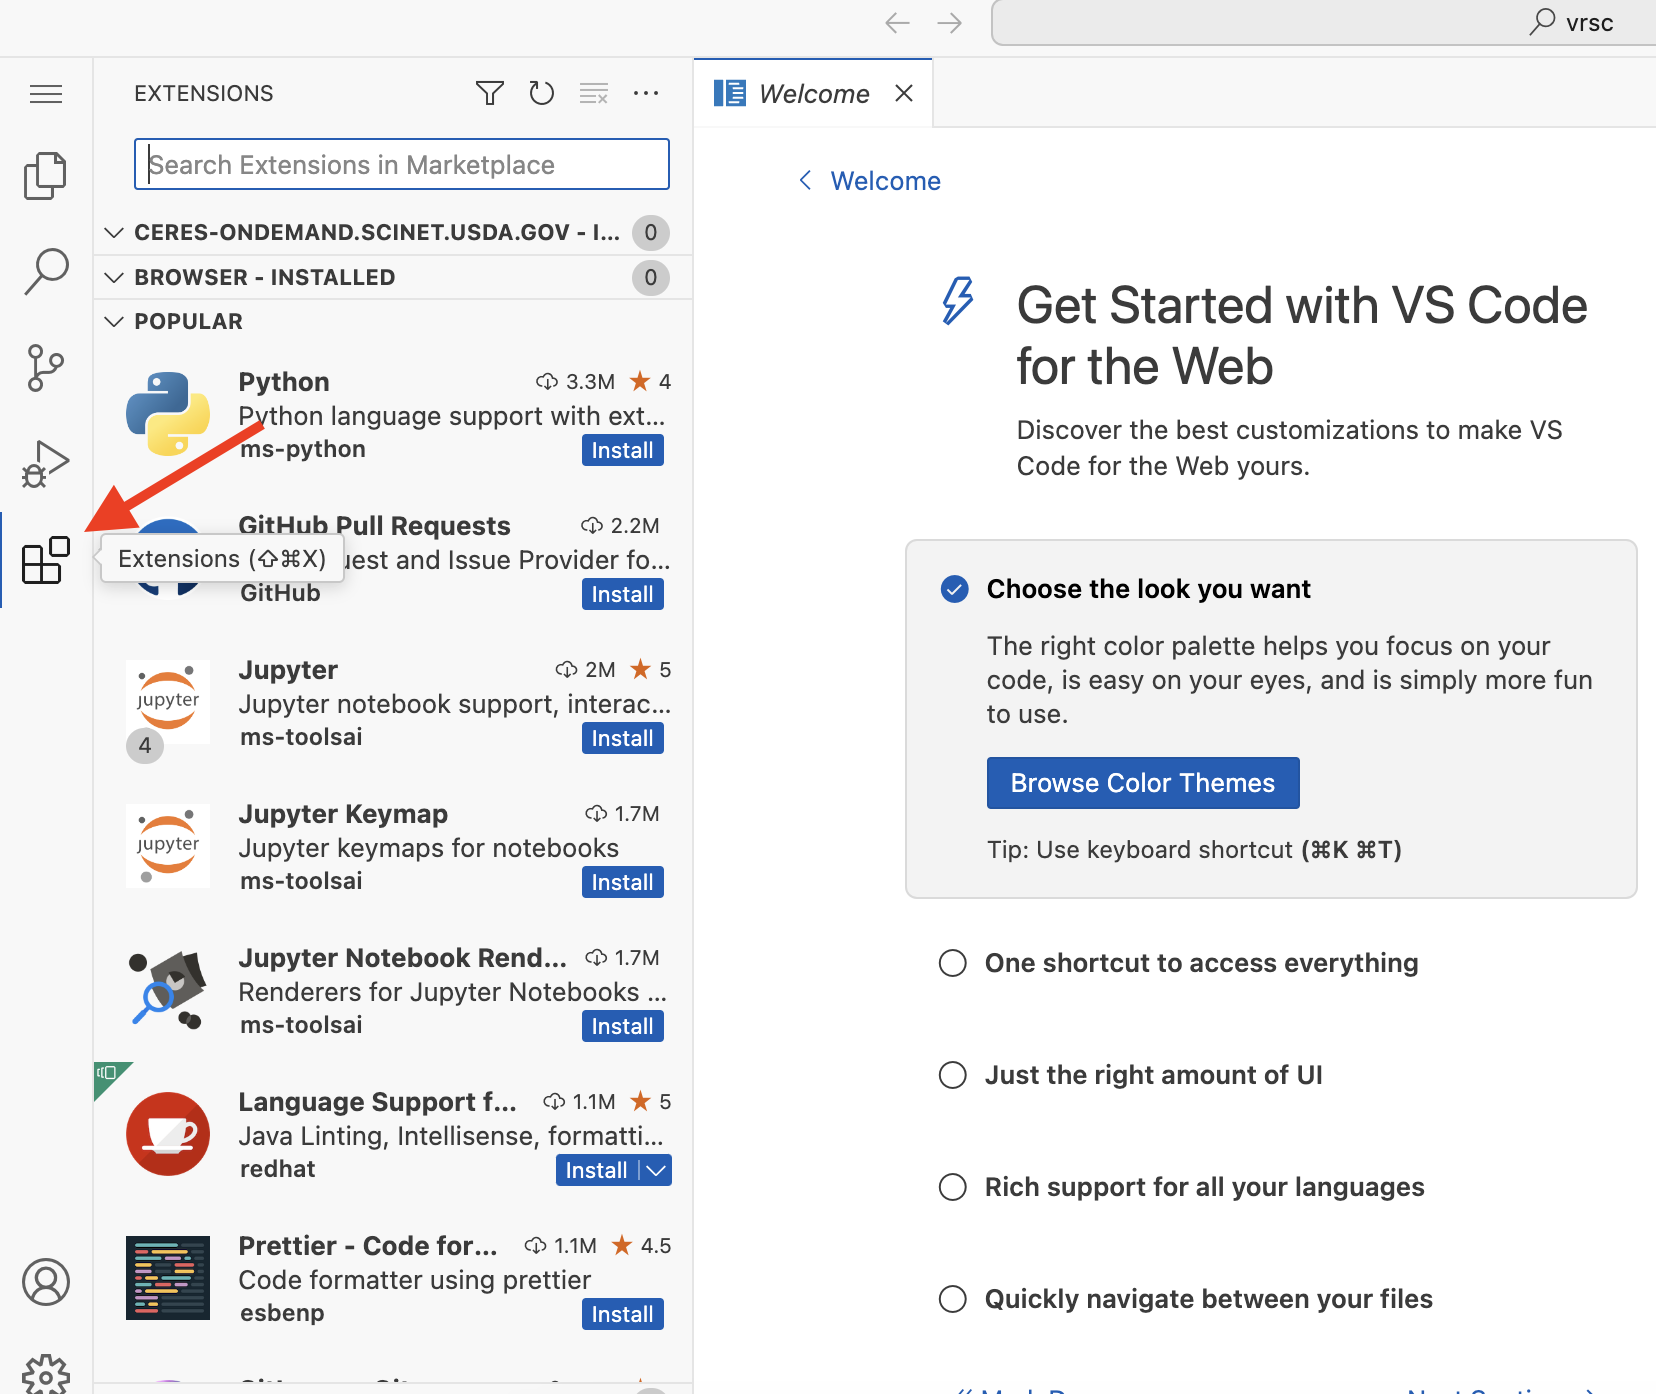
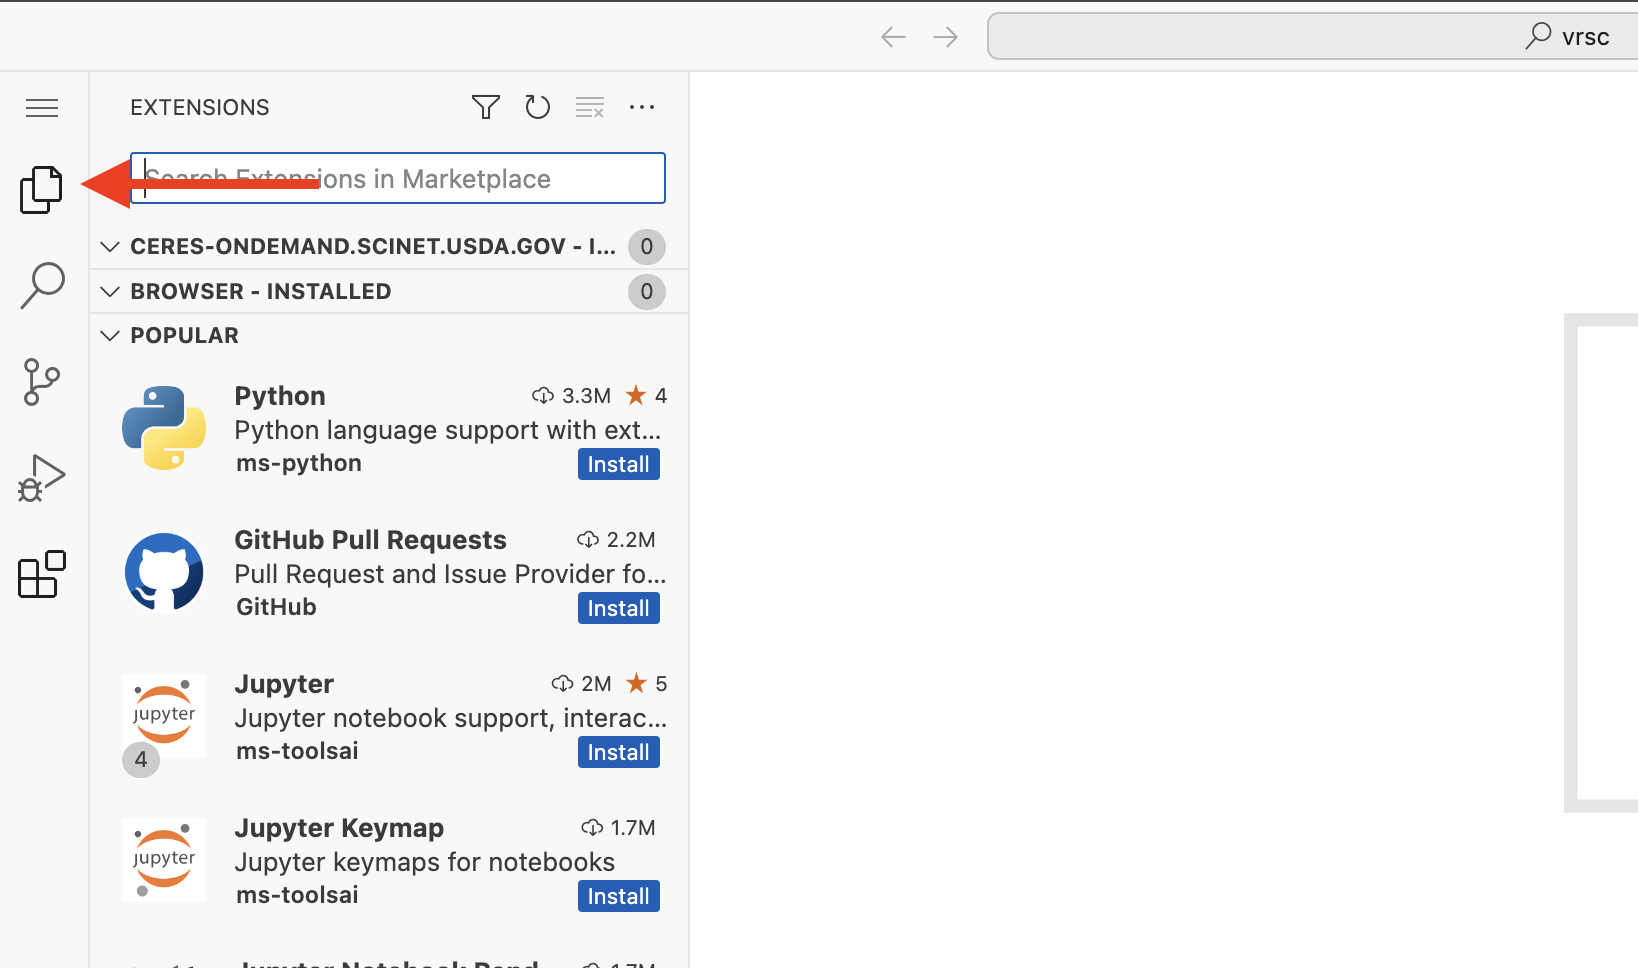
Managing extensions
OOD VS Code stores your extensions in your home directory by default, which can cause you to exceed your storage quota. To overcome this issue, you can move your extension directory from your home directory to a project directory and create a symbolic link to the new location.
- Create a symbolic link to store extensions. This only needs to be done the first time you run OOD VS Code.
- Open the terminal window by going to:
“File” -> “View” -> “Terminal” - In the terminal, type the following commands, replacing
<project_name>with your project name and<scinet_username>with your username.- Create a folder in your project directory for the VS Code extensions:
mkdir -p /project/<project_name>/<scinet_username>/.local/share/code-server - Move any existing extension files to the new directory:
mv ~/.local/share/code-server/ /project/<project_name>/<scinet_username>/.local/share/code-server - Create a symbolic link between the old extension directory and the new one:
ln -s /project/<project_name>/<scinet_username>/.local/share/code-server ~/.local/share/code-server
- Create a folder in your project directory for the VS Code extensions:
- Open the terminal window by going to:
- Install any desired extensions from the Extensions sidebar on the left-hand side. Once an extension is installed, it will automatically be available for future OOD VS Code sessions.
Moving files to and from the local computer
- Open the File Explorer sidebar on the left-hand side of OOD VS Code.
- To download files:
- Right-click on the file you would like to download from the cluster to your local computer and select “Download…” from the menu. The file download will automatically start.
- To upload files:
- Right-click on the folder where you would like to upload the file to and select “Upload…” from the menu.
- Select the file on your local computer in the File Upload dialog that appears and then click “Open”
Method 2: Registered Tunnel for VS Code
(local VS Code)
VS Code has a registered tunnel extension that allows users to securely work on projects hosted on remote machines without SSH. The tunnel extension creates a secure and encrypted connection between your local computer and a remote machine.
If you’re unfamiliar with Remote Tunnels, see the VS Code Remote Tunnels documentation
Why use a registered tunnel for VS Code?
- Easy access: There is no need for SSH keys or network configuration to connect to development environments remotely.
- Secure: This extension protects your code/projects by using an encrypted connection and prohibits unauthorized access.
- Offers flexibility: Users can securely access their projects and work from anywhere.
This guide will show you how to set up a registered tunnel for VS Code.
Opening a Registered Tunnel
To use registered tunnels, you must have either a Microsoft or GitHub account. USDA employees should use a Microsoft account, as their USDA Office 365 email is a Microsoft account that may be used.
These instructions assume you are using your USDA email, but using a GitHub account will be very similar.
Set up local VS Code
(Only needed the first time)
- Open your local copy of VS Code.
- Install the “Remote – Tunnels” extension from Microsoft using the Extensions sidebar on the left-hand side.
- If you don’t see the Welcome Screen, open it.
“Help” -> “Welcome” - Open a tunnel:
“Connect to…” -> “Connect to Tunnel” -> “Microsoft Account” - If you receive a prompt that “The extension ‘Remote – Tunnels’ wants to sign in using Microsoft,” click “Allow”.
- You should be prompted to log in.
- If you are already signed into your account in VS Code, this option will not appear and you may skip this step.
- You should receive a page telling you that you are signed in and can close your web browser.
Start a tunnel on Ceres
In Open OnDemand select the VS Code Tunnel app under Interactive Apps:
Start a new VS Code session with the resources you need. Once the session is running, you will be given instructions to authenticate your device:
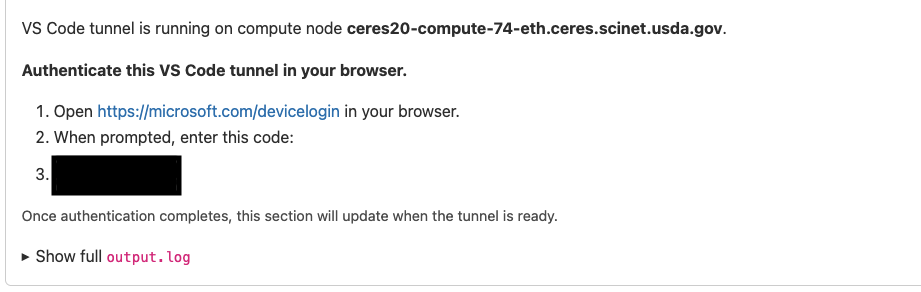
- You should see a message to open a web browser and go to https://microsoft.com/devicelogin and enter a code. Do as instructed.
- After entering the code, you will be asked to either log in or select an account to register the tunnel with. Register it to your USDA account, unless you used a different account when setting up your local VS Code.
Connect to the tunnel on Ceres
- Return to your local VS Code instance.
-
Registered tunnels will show up in the Remote Explorer sidebar. It should say something similar to “ceres20-compute-74 running”.
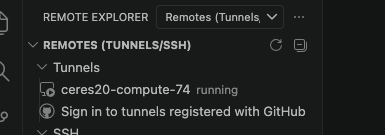
If you do not see your tunnel:
- You can refresh the list by pressing the refresh button next to “Remotes (Tunnels/SSH)”.
- If you still do not see it, open the Welcome screen and connect to the tunnel from there:
“Connect to…” -> “Connect to Tunnel” -> “Microsoft Account” -> “<tunnel>running”
- Select your tunnel.
- You should now be running on one of the Ceres compute nodes.
- To confirm:
- Open a terminal from the menu:
“Terminal” -> “New Terminal” - In the terminal, run the command:
hostname - The command should respond with something similar to “ceres20-compute-74”.
- Open a terminal from the menu:
- To confirm:
Closing a Registered Tunnel
When you are done using a tunnel, it is important to close it to free up those resources for other users to use. To do this:
- On Open OnDemand, go to My Interactive Sessions.
- Find your VS Code session and click Cancel.
Troubleshooting
The VS Code OnDemand window stopped responding.
- Most likely your Open OnDemand session timed out. Return to the Ceres Open OnDemand webpage and request a new session.