
This guide provides detailed information about the storage locations provided by SCINet and how to use them. Figure 1 below illustrates how these storage locations are related. To learn more about how to transfer files among them, please see the File Transfer Methods guide.
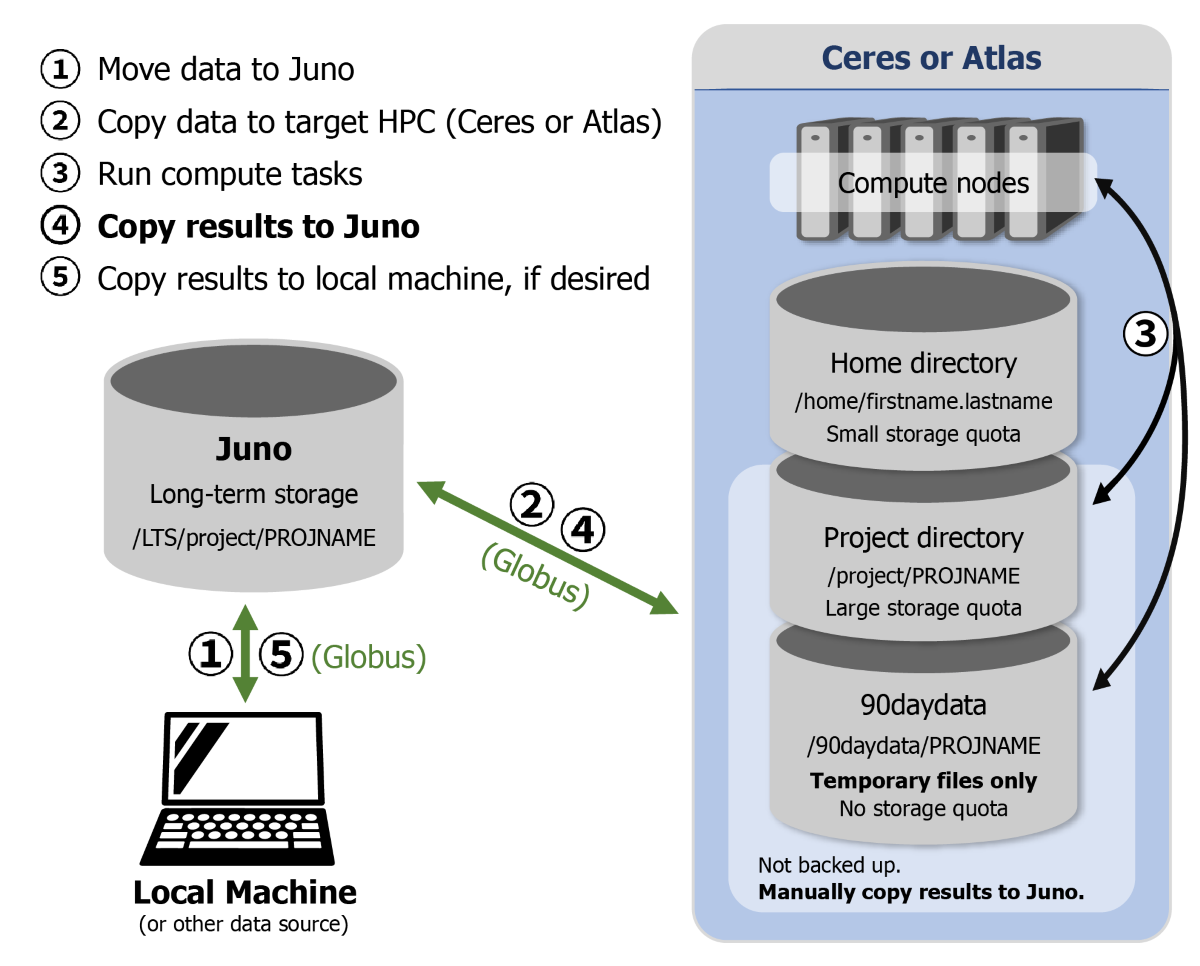 Figure 1. Recommended procedures for managing data on SCINet infrastructure.
- Move data to Juno
- Copy data to target HPC (Ceres or Atlas)
- Run compute tasks
- Copy Results to Juno
- Copy results to local computer, if desired
Cluster storage
There are multiple places to store files on the Ceres and Atlas clusters and those locations serve different purposes. These storage options are co-located with compute nodes and are best suited for files needed during computational work on the clusters.
Warning
Cluster storage is not backed up and should not be relied on for long-term storage purposes. Please use Juno permanent storage for storing your files long term.
Home directories
Home directories (/home/<scinet_username>) are private directories that are only accessible to the user (and the system administrators when necessary). When a user logs in to Ceres or Atlas, they automatically start in their home directory.
Home directories have 30 GB quotas and are intended to be mainly used for configuration and login files. Code, data, and software are best suited for project directories. See the Storage management for software installation section below for guidance on how to avoid installing software in your home directory.
Project directories
Project directories (/project/<project_name>) are typically associated with ARS research projects and allow for collaboration and larger storage allocations.
While it’s possible to perform computational work on Ceres or Atlas using only home directories and Large Short-term Storage in /90daydata/shared, it is highly recommended to request a project directory. Having a project directory will allow you to install software packages in /project and keep important data on Juno Permanent Storage.
To learn more about SCINet projects, see the SCINet Project Management guide.
Large short-term storage
Large short-term storage (/90daydata) does not have a storage quota (i.e., there is not an imposed limit to how much space you can consume at a time), but files older than 90 days will be automatically deleted. This is permanent and the files cannot be recovered.
Each SCINet project will have a dedicated project directory in /90daydata at /90daydata/<project_name>. In addition, /90daydata/shared is open to all users on Ceres and Atlas. Anyone can create a directory in /90daydata/shared and store files there which will be readable by everyone on the system unless the file owner limits access using the chmod command.
Please Note: If you download archived files, they may contain files with an access date from long ago. This date will still trigger deletion, so make sure that the files have a new access date. For example, when you untar a .tar or .tgz file, use the -m flag. If you use rsync to transfer files to /90daydata, do not use the -a flag, as that preserves date stamps.
Temporary local node storage
If faster data throughput is needed during a compute job, you can use the storage space on the disk drive on each of the compute nodes (1.5+ TB) by reading and writing to $TMPDIR. This is temporary storage that can be used only during the execution of your job. Only processes executing on a node have access to this space. Multiple jobs running on the same node share this space, so an individual job might not be able to use the full capacity of the disk drive. If all local space is needed for a job, request the whole node.
To use this local storage, the following workflow should be used. These steps may be taken interactively (when using salloc or srun) or in batch mode. In batch mode, the copy commands below should be added to the job script.
- Copy any required input files to the local file system, e.g.,
cp /project/<project_name>/<input_files> $TMPDIRwhere
<project_name>is the name of your project directory and<input_files>is the remainder of the path to the files to be used by your job (to copy a whole folder, use the-roption). -
Run your code, using input files located in
$TMPDIRand writing output to$TMPDIR. - Copy final results to the desired storage location, e.g.:
cp $TMPDIR/<final_results> /project/<project_name>/<final_results>
Note that files in $TMPDIR will disappear at the conclusion of your job. Any files which are not copied out of $TMPDIR cannot be recovered after your job has finished.
This storage is useful for workflows that require very high disk read/write throughput, such as reading and writing large numbers of small files.
Juno permanent storage
Project directories on Ceres and Atlas are not meant to be used for long-term storage. Data that cannot be easily reproduced should be manually backed up to Juno. Juno is a large, multi-petabyte SCINet storage device at the National Agricultural Library in Maryland. For instructions on how to transfer data to and from Juno, see the File Transfer Methods guide.
Please only store original data or results on Juno that are not archived or available elsewhere. For example, DNA sequence data downloaded from NCBI should not be stored on Juno.
Storage management for software installation
Many software applications are available on the clusters as modules; however, sometimes users need to install software by themselves. Since software packages often default to installing in home directories and home directories have a small quota, it is recommended to install software in project directories. The Installing R, Python, and Perl Packages and Conda guides have examples of installing packages and environments in a project directory.