Globus is the recommended method for transferring data to, from, or among Ceres, Atlas, and Juno. It provides faster data transfer speeds compared to scp, has a graphical interface, and does not require authentication for every file transfer. To transfer data to or from a local computer, users will need to install Globus Connect Personal, which does not require admin privileges.
To supplement the documentation here, we also provide an instructional video that demonstrates how to transfer files using Globus as well as how to authenticate with LincPass or Login.gov.
Login
- In a browser, navigate to https://www.globus.org/ and click “Log In” in the upper right corner.
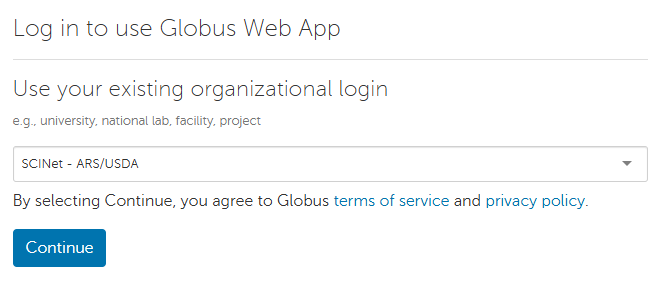
- Select “SCINet - ARS/USDA” in the existing organizational login dropdown menu to use your SCINet credentials to log in.
- You should now be on the Globus “File Manager” page. You should see two panels. (If you don’t, click on the 2-panels icon at the top right of the screen.)

Copying data
- The two panels represent the two systems that you want to copy data between. You will need to select a Collection for each panel and possibly authenticate.
- Click in the “Collection” box on one of the panels. A selection page will appear.
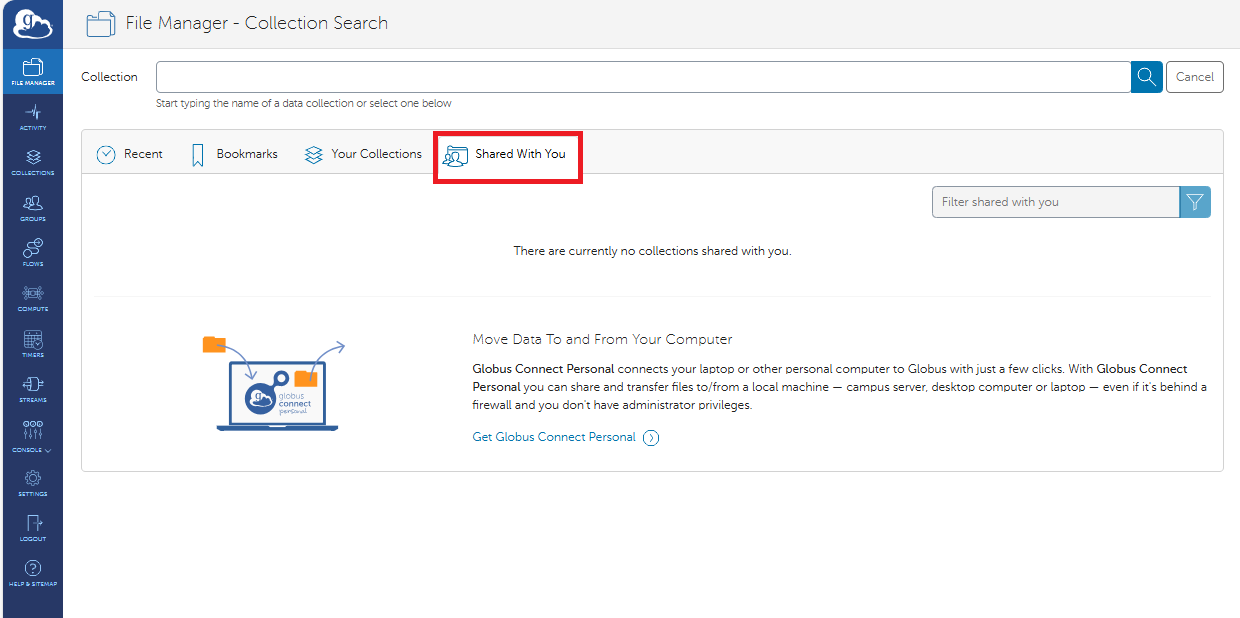
Recent collections will be listed under the “Recent” tab.- You can click on the other tabs to see collections that you’ve bookmarked, created, or that have been shared with you.
In any of these tabs, you will also see the “Get Globus Connect Personal” button. See below for how to set up Globus Connect Personal on your local computer to transfer data to and from your local computer.
- You can click on the other tabs to see collections that you’ve bookmarked, created, or that have been shared with you.
- If you see your desired collection in the “Recent” tab, click it and continue. If you do not see your desired collection, start typing the name in the box at the top. When your collection appears, select it.
- Type or select “SCINet-Ceres” for Ceres, “SCINet-Atlas” for Atlas, or “SCINet-Juno” for Juno.
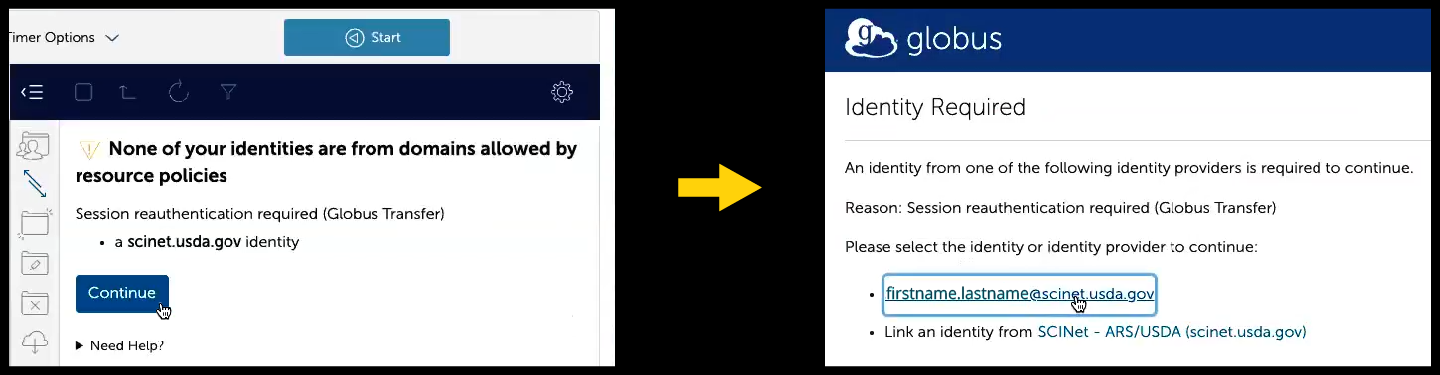
- If authentication is required for the selected collection, click “Continue” and then your SCINet-associated identity (i.e., scinet_username@scinet.usda.gov) to reauthenticate.
- To transfer data between the Ceres and Atlas clusters, log in to SCINet-Ceres in one panel and to SCINet-Atlas in the other panel. Similarly, to transfer data to/from Juno, log into SCINet-Juno in one of the panels.
- Click in the “Collection” box on one of the panels. A selection page will appear.
- Once you have selected a Collection on both panels, you will need to navigate to the files you want to copy in one panel (source panel) and navigate to the location to which you want them copied on the other panel (destination panel). You can either click on directory names or type the full path in the “Path” box (under the “Collection” box).
- Before you start your copy, look at the “Transfer & Timer Options” near the top of the page between the two panels (click on the down arrow to see available options). To see a short description of each option, click on the “i” next to the option. Select any options applicable to your transfer.
- Option you might want to select before starting your transfers include:
- Preserve source file modification times
- Skip files on source with errors
- Fail on quota errors
- We also recommend “Do NOT verify file integrity after transfer” which approximately doubles the effective transfer speed.
- Option you might want to select before starting your transfers include:
- To start copying files, click the blue box with the arrow at the bottom of the page pointing in the direction of the destination pane.
- You may now click “Activity” on the left-side menu to see a list of current and prior transfers. Click on “File Manager” at the top left of the page to get back to the main page.
Globus Connect Personal
To transfer files to or from your local computer, you can use Globus Connect Personal (GCP).
Installation
- If you are on a SCINet-X location’s café machine:
- Please see the GCP setup instructions specific to café machines.
- If you are on a USDA-managed Windows laptop or workstation:
- If your workstation has CEC support, you may be able to install GCP directly from the Software Center.
- If you are not on a USDA-managed laptop, do not have Software Center, or do not see GCP in the Software Center:
- A link, “Get Globus Connect Personal”, can be found in the Collection Search page (by clicking on the “Collection” box in the “File Manager”).
- The installation instructions for Globus Connect Personal are available here:
By default on Windows, GCP prompts to be installed in C: \ Program Files which requires administrator rights. However, you don’t need administrator rights to install GCP on your local computer. If you do not have administrator rights, browse to a place to which you have write access (e.g., your Desktop folder) when prompted for an installation location. If you encounter further permission issues, contact your local IT staff for assistance.
Please note: GCP defaults to access your user “Documents” folder on your local computer, but you can change that to another folder (e.g., a “globus” subfolder within your “Documents”) to limit Globus’s access to your local files. To make this change:
- Right-click on the GCP icon in your local computer’s system taskbar (or menu bar or system tray, depending on your operating system).
- Select “Options” or “Preferences” (the term used depends on your operating system), which will open a pop-up window.
- Navigate to the “Access” tab in the new pop-up window.
- If you want to remove access to your “Documents” or other folder, select the folder and then click the “-“ button.
- To add a new folder Globus can access, click on the “+” button and select a folder in the file browser pop-up that appears.
Setup
- Once GCP is installed, launch the application and a Globus Connect Personal Setup pop-up window will appear. Click “Log In”.
- Go to the browser window that opens behind the pop-up and click “Allow”.
- On the log in page, select “SCINet-ARS/USDA” from the dropdown menu, click “Continue”, and complete the eAuth login procedure.
- If this is your first time authenticating Globus via your SCINet account, you will see a welcome page:
- If you already have a Globus account with another authentication identity (e.g., via ORCID or a university), click “Link to an existing account” to join your SCINet-ARS/USDA Globus identity to your existing account. (You can also link identities later using the steps on the Globus linking account instructions.)
- Otherwise, click “Continue” to register your SCINet account with a new Globus account. When registering, type “USDA-ARS” as your organization and select the “non-profit research or educational purposes” option. Agree to the terms and click “Continue”.
- If this is your first time authenticating Globus via your SCINet account, you will see a welcome page:
- The next page will ask you to agree to set up GCP and ask for a name for this consent for future reference. You can keep the default value which should be the name of your local computer. Click “Allow”.
- Now a pop-up window for “Collection Details” will appear.
- For “Collection Name”, provide a unique name that will be recognizable to you as your local computer. For example: your initials and “_workstation” (e.g., ABC_workstation).
- Providing a description is optional.
- Do not select the “High Assurance” checkbox (read about sensitive data on SCINet infrastructure here).
- Click “Save”.
- You should get a “Setup Successful!” pop-up with the name of your collection.
- If you would like to modify your collection name, you can click “show collection details” and, on the right of the collection details page, click “edit attributes” to edit the collection’s name.
- When you are happy with the collection name, click “Exit Setup”.
You can check the status of your GCP connection by clicking the GCP icon in your task bar.
![]()
You can now transfer data from your local computer using Globus.org while Globus Connect Personal is running. You should find the GCP collection made above in your list of collections, and you will be able to connect to it while the local GCP connection is running on your local computer. After selecting your local computer collection, you should see in the Globus File Manager the files you have on your local computer.
See the copying data section for more information about copying data using Globus.
Globus guest collections
Globus guest collections allow SCINet project owners to share a subdirectory in their project space with external collaborators who do not have SCINet accounts. The subdirectory is shared using Globus, and the collaborators will need Globus accounts.
Request a Globus guest collection
- To share files externally using Globus, you will first need to request access to create a shared guest collection. Visit the resource request page and submit the request form. Please allow a few business days for review and processing of your request.
- After your request has been reviewed, you will receive an email indicating whether it was approved. Once your request is approved, you may proceed with creating a guest collection. The email you receive will include the approved settings of the guest collection for you to reference as you create your guest collection.
Create a guest collection
- Log in to www.globus.org. If you need help accessing and navigating Globus, please see the Globus data transfer instructions.
- Navigate to the SCINet system collection (e.g.,
SCINet-Juno) and project space (e.g.,/LTS/project/your_project_name) for which your guest collection was approved.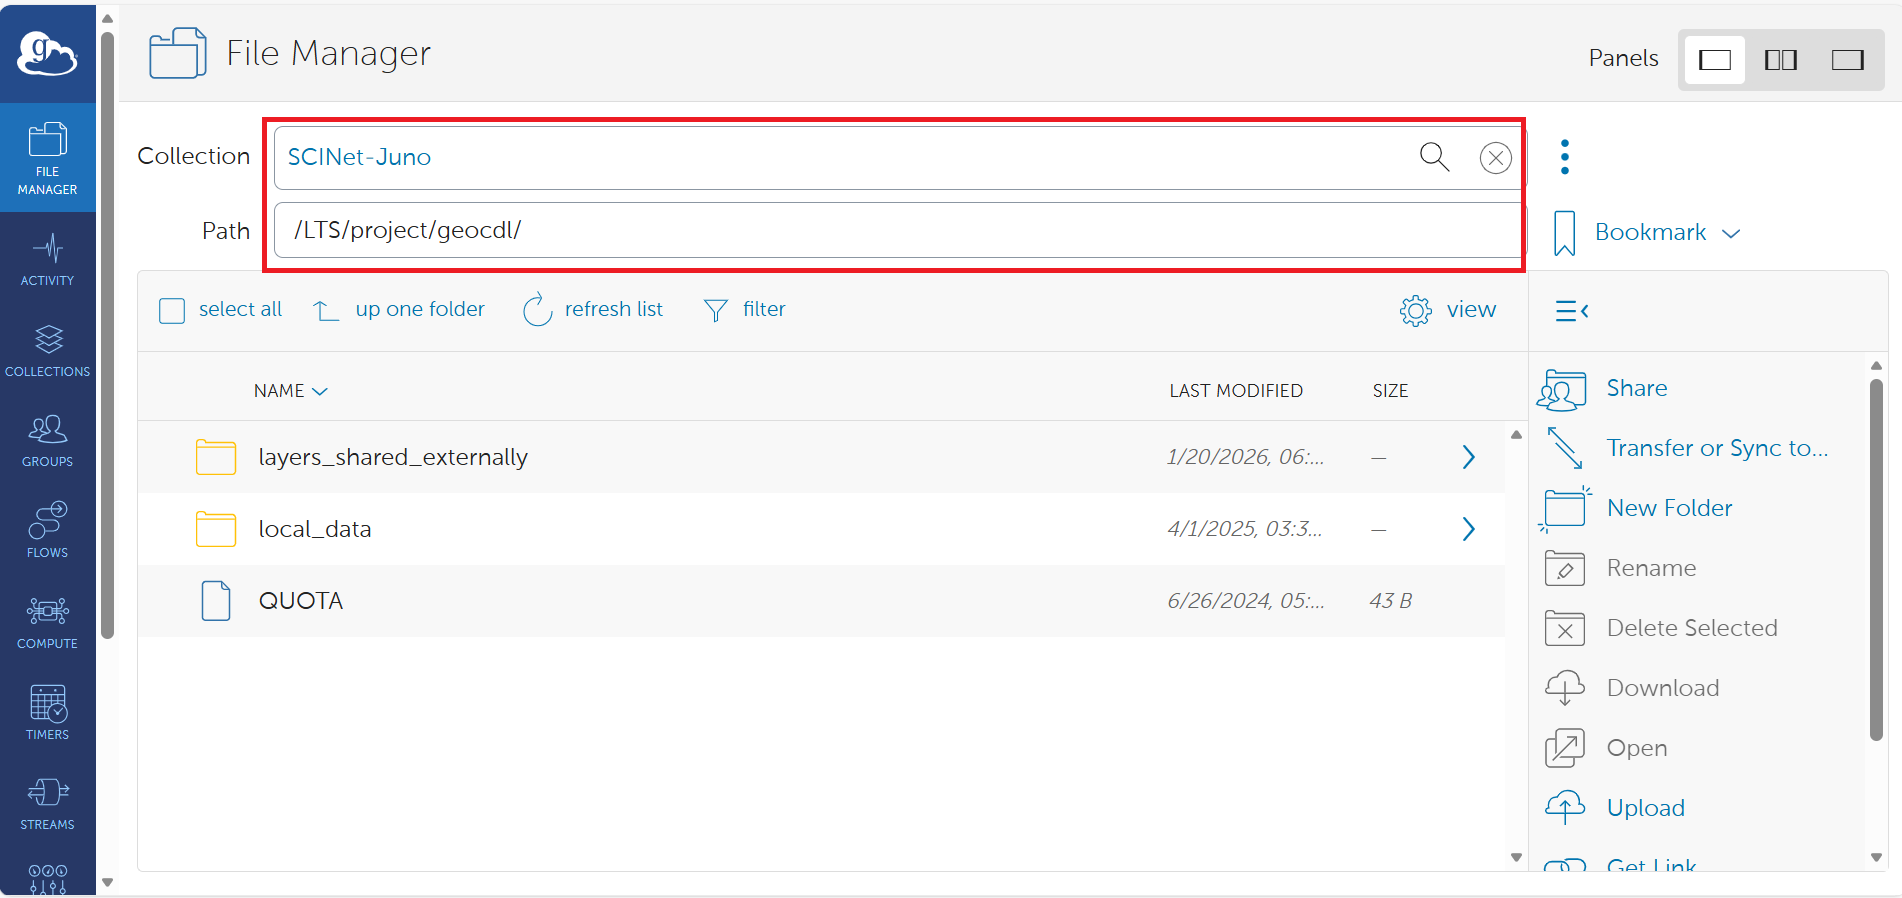
- If the subdirectory approved for sharing already exists, navigate to and select it. If the approved subdirectory does not yet exist, create it by clicking the “New Folder” button in the center of the page, then select it.
- Click on “Share” in the center of the page.
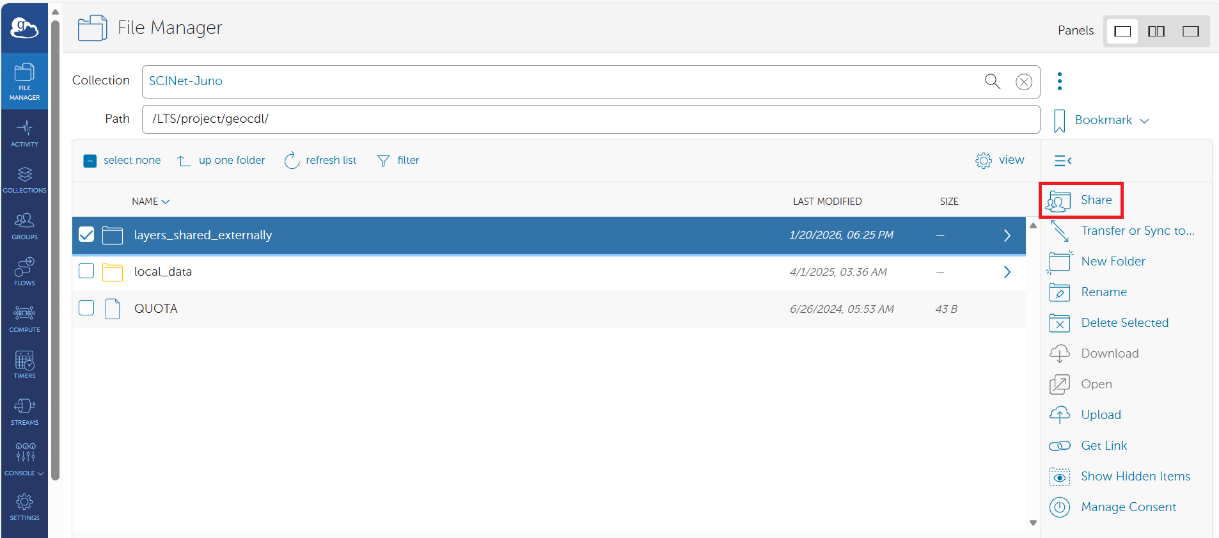
- You should now see a “Collections” page. Click the “Add Guest Collection” button in the top right corner.

- You should now see a “Create new Guest Collection” page.
- The “directory” field should be prepopulated with the approved subdirectory path. If it is not, use the “Browse” button to navigate to and select the approved subdirectory path.
- Enter a descriptive “Display Name” for the guest collection. This name is what your collaborators will see as the guest collection name, and a descriptive name can help them easily find the collection (see the Share your guest collection with collaborators section below for more on how collaborators access your guest collection).
- Providing additional details is optional, but more information can be helpful when sharing with others.
- You can click on “view more fields” for additional kinds of information to provide.
- Filling in “Contact Email” is recommended so your collaborators know whom to contact if there are questions about the files available in the guest collection.
-
“Default Directory” specifies the directory that a user will see when they first connect to your Guest Collection.
Note that, in this case, the root directory (
/) means the root of the collection, which will point to the subdirectory in your project folder that you are sharing. We recommend leaving this as/unless you want users to start in a subdirectory of the collection.
- Note that the information provided on this page will be accessible to anyone who has access to this guest collection.
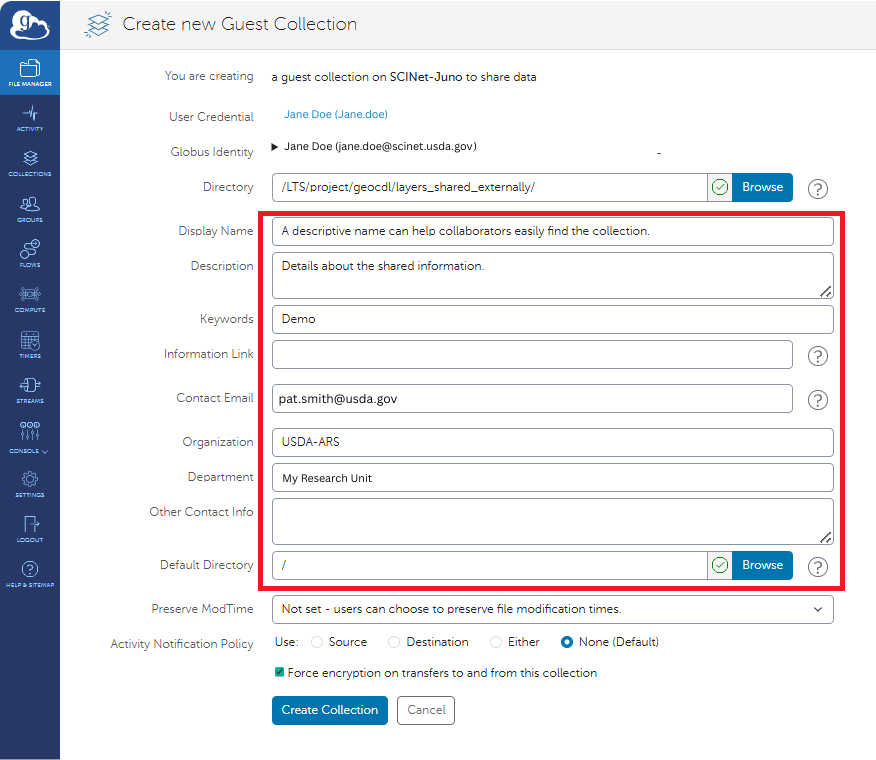
- When all desired details are provided and settings chosen, click the “Create Collection” button.
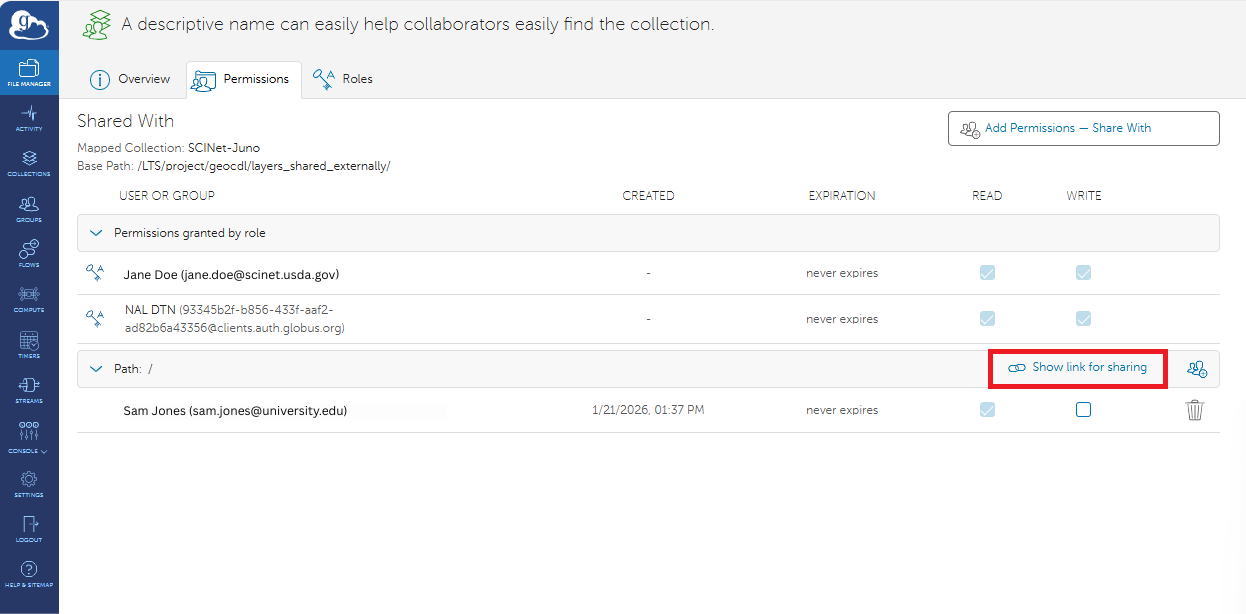
- You should now see a “Permissions” page for your guest collection. Permissions are how you define who can see what in your guest collection. Click on the “Add Permissions – Share With” button in the top right corner.
- Note that you can create multiple sets of permissions. For example, if you are approved to share with multiple collaborators, you can share different subsets of your guest collection with different collaborators by adding multiple permissions.
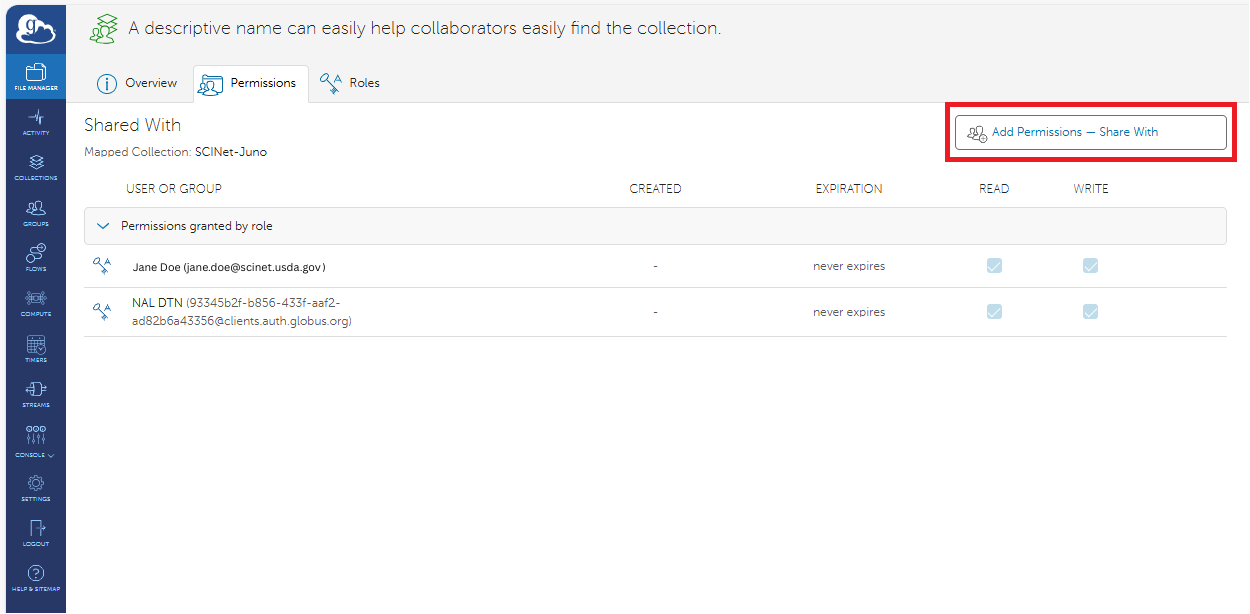
- Note that you can create multiple sets of permissions. For example, if you are approved to share with multiple collaborators, you can share different subsets of your guest collection with different collaborators by adding multiple permissions.
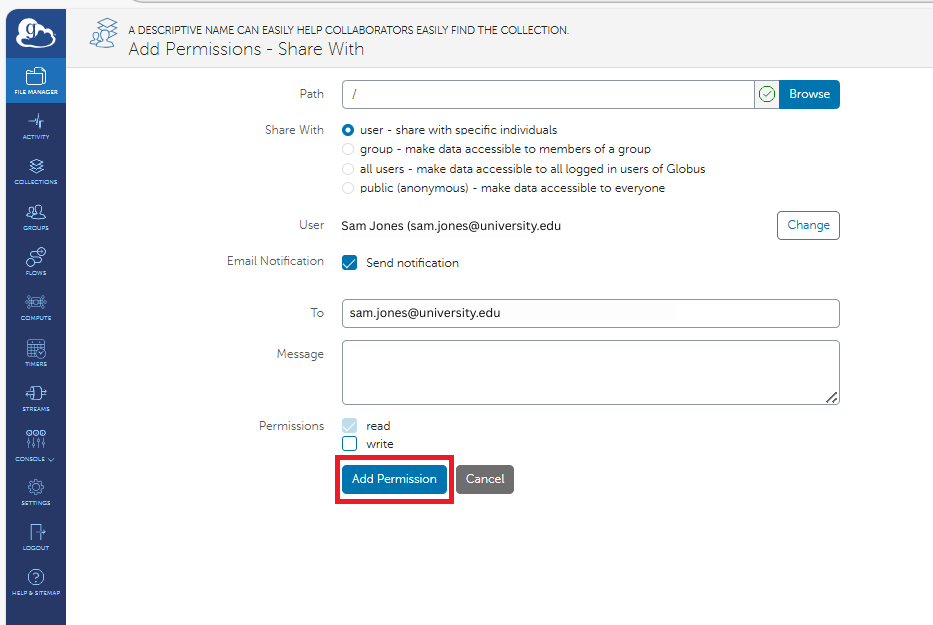
- You should now see an “Add Permissions – Share With” page.
- “Path” will be prepopulated with the default directory you chose when you created the guest collection. This can be modified to be a subdirectory within your guest collection if you would like this set of permissions to have access to only a subset of your guest collection. In most cases, this can be left as the default.
- What you may select for “Share With” depends on the level of access for which you are approved as indicated in your approval notification email.
-
If you are approved for restricted read access: you must select “user” or “group”.
Groups of Globus users can be defined using the “Groups” tab on the far left of the page. In most cases, it is easier to select “user” and give specific users permission to access the guest collection instead of creating a group, adding users to it, then giving the group permission to access the guest collection.No matter which option you select, you may only add the Globus usernames listed in the approval notification email. If you need additional collaborators approved, please email scinet_vrsc@usda.gov.
-
If you are approved for unrestricted read access: you may select “all users”.
Note that although the “public (anonymous)” option appears available, Globus authentication is required for SCINet guest collections.
-
- Currently, only “read” access is allowed for SCINet guest collections.
Share a guest collection with collaborators
How you can inform your collaborators about your guest collection depends on the approved level of access as indicated in your approval notification email.
Unrestricted access
-
After you add permissions to a guest collection, you return to the “Permissions” page for the guest collection. (You can also later navigate to it by clicking on “Collections” in the left navigation bar, clicking “Sharable by You”, clicking the guest collection from the list of sharable collections, and then clicking the “Permissions” tab.)
For each path you share, there is a “Show link for sharing” option. You can click on that option to see a URL that you can share with collaborators which will let them access your guest collection.
-
Alternatively, Globus users can use the Collections search page to find the display name you chose when creating the guest collection.
Restricted access
- The unrestricted access options work for restricted access as well.
- Additionally, when you give your collaborators permissions to your guest collection, a link is automatically sent to them via email, and clicking on that link will take them to the Globus “File Manager” page with the guest collection open.
- Collaborators can also find the guest collection by clicking on the “Shared with You” tab on the Collection search page.